GitHub Multi-Environment Setup for Snowflake
GitHub multi environment setup for Snowflake, deploying based on branch name, using GitHub actions.
Intro
Security Warning: Before committing your code, database names, and internal schema structures into your workflow YAML files, always ensure that your GitHub repository is set to Private
This tutorial covers setting up an empty GitHub repository to run a Snowflake pipeline and upload source code to a Snowflake stage. You might find yourself having multiple environments, most pipelines will focus on deploying to dev, and prod environments. However, the logic can be multiplied for as many environments as you need.
A few prerequisites for this tutorial:
- A Snowflake account with a private key authentication set up.
- A GitHub account with the necessary permissions to create, manage secrets, environments and workflows.
Folder structure
For the sake of this tutorial, we will use the following folder structure:
.github/workflows/
├── deploy-to-snowflake.yml
src/
├── training/
│   ├── training-script.py
│   ├── requirements.txt
Workflow considerations
This workflow will have the following responsibilities:
- Select environment
- Convert RSA key to PKCS8 format
- Create STAGE if not exists
- Upload source code to STAGE
- Create or replace SQL objects
STAGES will be used to store the source code of the pipeline. In my case, as I don’t have access to multiple environments, my stages will be created in different schemas of the same database.
STAGES are schema specific, so you will need an account with the following permissions:
| Privilege | Object | Notes |
|---|---|---|
| CREATE STAGE | Schema | Required only if creating a permanent stage. |
| USAGE | Schema |
GitHub secrets
First we have to define our environments in GitHub. Again, these will be used to deploy to different Snowflake environments or databases.
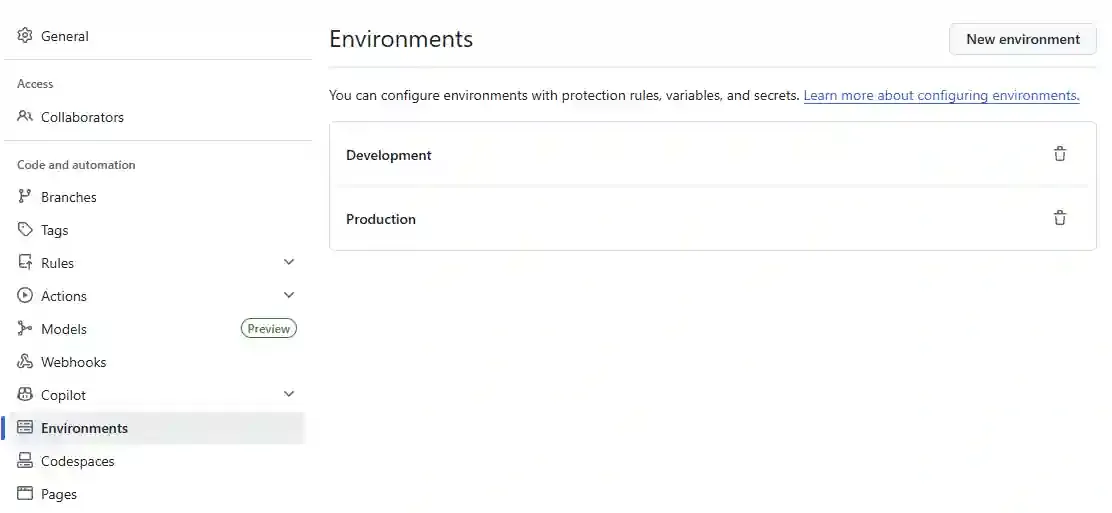
Next, click on each environment and we will define a list of variables:
- Environment Secrets:
- PRIVATE_KEY
- Environment Variables:
- ACCOUNT # Snowflake account identifier
- AUTHENTICATOR # SNOWFLAKE_JWT when using private key
- USER # Your service user
- ROLE # Snowflake role with necessary permissions
- WAREHOUSE # Snowflake warehouse
- DATABASE # Snowflake database
- SCHEMA # Snowflake schema

Do the same for Production, then we go ahead and create our Workflow.
Checking out the code and installing the Snowflake CLI
This downloads the repository code to the runner and installs the Snowflake CLI.
Make sure you always update the checkout actions to the latest version.
- name: Checkout code
    uses: actions/checkout@v6
# Install the Snowflake CLI for interacting with Snowflake
- name: Pip install Snowflake CLI
    run: pip install snowflake-cli-labs
Authentication setup
The private key format when generating it in Snowflake is RSA, but the snow cli expects PKCS8 format. So we need to convert it.
# Convert RSA key to PKCS8 format
- name: Convert RSA key to PKCS8 format
    run: |
    mkdir -p ~/.snowflake
    echo "${{ secrets.PRIVATE_KEY }}" > ~/.snowflake/id_rsa
    chmod 600 ~/.snowflake/id_rsa
    openssl pkey -in ~/.snowflake/id_rsa -out ~/.snowflake/id_rsa_pkcs8 -passin pass:
# This creates the connections.toml file in the .snowflake directory, which is the default location for snow cli
- name: Configure Connection
    run: |
    cat > ~/.snowflake/connections.toml << EOF
    [default]
    account = "${{ vars.ACCOUNT }}"
    authenticator = "${{ vars.AUTHENTICATOR }}"
    user = "${{ vars.USER }}"
    private_key_path = "~/.snowflake/id_rsa_pkcs8"
    role = "${{ vars.ROLE }}"
    warehouse = "${{ vars.WAREHOUSE }}"
    database = "${{ vars.DATABASE }}"
    schema = "${{ vars.SCHEMA }}"
    EOF
    chmod 600 ~/.snowflake/connections.toml
Uploading the file to stage
This is the actual step where we upload the file to the stage. We use the snow stage copy command to upload the file to the stage. We use the --overwrite flag to overwrite the file if it already exists.
# Before running any snow cli command, we need to make sure the connection is working
- name: Check Connection
    run: |
    snow connection test
# Create STAGE if not exists, this will ensure creation on the first run
- name: Create STAGE if not exists
    run: |
    snow sql -q "CREATE STAGE IF NOT EXISTS ${{ vars.DATABASE }}.${{ vars.SCHEMA }}.training_stage;"
# Upload source code to STAGE for our training script
- name: Upload source code to STAGE
    run: |
    snow stage copy "src/training/training-script.py" @${{ vars.DATABASE }}.${{ vars.SCHEMA }}.training_stage --overwrite
# --recursive (if pointing source to a directory)
Putting everything together
This is the complete workflow that will target the dev environment when pushing to the dev branch and the production environment when pushing to the main branch, it can also be triggered manually from a feature branch without creating a pull request (by using the workflow_dispatch input).
# deploy-to-snowflake.yml
name: Deploy Source Code to Snowflake Stage

on:
    push:
        branches: [dev, main]
        paths:
            - 'src/**'
    workflow_dispatch: # so that it can be triggered manually from GitHub Actions
        inputs:
            environment:
                description: 'Environment to deploy to'
                required: true
                default: 'Development'
                type: choice
                options:
                  - Development
                  - Production
jobs:
    deploy-to-snowflake:
        runs-on: ubuntu-latest
        # Dynamically set the environment context for the job to grab the right secrets/vars
        environment: ${{ github.event_name == 'workflow_dispatch' && github.event.inputs.environment || (github.ref == 'refs/heads/main' && 'Production' || 'Development') }}
        steps:
            - name: Checkout code
              uses: actions/checkout@v6
            # Install the Snowflake CLI for interacting with Snowflake
            - name: Pip install Snowflake CLI
              run: pip install snowflake-cli-labs
            # Convert RSA key to PKCS8 format
            - name: Convert RSA key to PKCS8 format
              run: |
                mkdir -p ~/.snowflake
                echo "${{ secrets.PRIVATE_KEY }}" > ~/.snowflake/id_rsa
                chmod 600 ~/.snowflake/id_rsa
                openssl pkey -in ~/.snowflake/id_rsa -out ~/.snowflake/id_rsa_pkcs8 -passin pass:
            # This creates the connections.toml file in the .snowflake directory, which is the default location for snow cli
            - name: Configure Connection
              run: |
                cat > ~/.snowflake/connections.toml << EOF
                [default]
                account = "${{ vars.ACCOUNT }}"
                authenticator = "${{ vars.AUTHENTICATOR }}"
                user = "${{ vars.USER }}"
                private_key_path = "~/.snowflake/id_rsa_pkcs8"
                role = "${{ vars.ROLE }}"
                warehouse = "${{ vars.WAREHOUSE }}"
                database = "${{ vars.DATABASE }}"
                schema = "${{ vars.SCHEMA }}"
                EOF
                chmod 600 ~/.snowflake/connections.toml
            # Before running any snow cli command, we need to make sure the connection is working
            - name: Check Connection
              run: |
                snow connection test
            # Create STAGE if not exists, this will ensure creation on the first run
            - name: Create STAGE if not exists
              run: |
                snow sql -q "CREATE STAGE IF NOT EXISTS ${{ vars.DATABASE }}.${{ vars.SCHEMA }}.training_stage;"
            # Upload source code to STAGE for our training script
            - name: Upload source code to STAGE
              run: |
                snow stage copy "src/training/training-script.py" @${{ vars.DATABASE }}.${{ vars.SCHEMA }}.training_stage --overwrite
            # --recursive (if pointing source to a directory)
Next Steps
Once we have our repository set up for deploying the source code in multiple environments, we can move on to setting the ML Job in Snowflake.